I am finally back from my vacation. Last week I was in Egypt with my family. They had an Internet café in the reception of the hotel, but it did only work one time when I was there. But I guess it was a good thing to be offline for some time. At least my family appreciated it. Prior to that I was in Istanbul. Turkey. This was a trip together with my colleges. I learned a lot of new things about the Android platform. The most interesting thing was to try out Robotium, a testing framework for Android. It is built around the existing testing framework found in Android, but it is much simpler. If you want to know more, please read this excellent article.
That is all for now. Nice to be back at home with a working Internet connection.

Showing posts with label Other. Show all posts
Showing posts with label Other. Show all posts
Apr 5, 2010
Mar 31, 2010
Using Amazon S3 to Backup a Synology DS110j
One of the most important features of the Synology DS110j NAS is the ability to let it backup itself. This is actually a new feature in V2.3 of the DiskStation firmware. Here are my first impressions.
There is one thing that bothers me; I could not re-use the old bucket which I created when using Jungle Disk, at least what I could tell. When selecting the existing bucket, the DiskStation does not accept it because of its long name. The Jungle disk also create strange directory layout with something that looks like a tree map. This is in normal cases hidden for the user; Jungle fixes to mount a network drive. The network drive looks like a normal directory. If I remember correctly this is something that I choose when creating the original bucket. Anyway I tested and created a new bucket. I then started a backup of a small amount of files to test how it worked. The DiskStation solution is much simpler than Jungle Disk. One must consider that the Amazon backup is a new feature of the DiskStation software, while Jungle Disk has been around for some time. For example, you could not encrypt the content. You only use an encrypted transfer, that is you are using HTTPS for transfer. Another thing that I miss is a progress bar or similar. As it is today, you only see the status like this:

You only see that the backup is going on. I think I need to file a feature request for this. Notice that the backup type is a little bit misleading. As I wrote earlier, it is only the transfer that is encrypted.
The Jungle Disk desktop software discovered the new bucket I created for the DiskStation server. It informed that the bucket was compatible with Jungle Disk. I was then a little bit surprised when I could not discover any contents there. I decided to get another Amazon S3 browser. I found the CyberDuck browser. It has the capability to browse an Amazon S3 account, as well as a multitude of other servers like FTP, Samba etc. The FTP browser could come in handy when connecting to the FTP server in the DiskStation. (I have actually tested it and it worked without any problems.)
The CyberDuck browser works like a charm with all my buckets, see the picture below.

This shows the directory layout for the DiskStation and the Jungle Disk buckets. Notice that I have decided to do no incremental backup for the DiskStation. This is because I want to be able to restore my data, even if my DiskStation crashes. I could for example use CyberDuck to download all the contents. I think that I have configured the Jungle Disk to do incremental backup, which is like comparing apples and oranges. Anyway I am a little bit wiser than I was when I configured Jungle Disk from the beginning. The drawback is of course that is uses a lot of more space on the server. My opinion is that it is worth the extra money to be on the safe side. It is going to take some days to backup the pictures once more, but the DiskStation could work 24/7 without affecting my daily work. Meantime I could test other DiskStation features. There seems not to be any performance problems using other services while doing the backup. But this is only a problem during the first backup. When the initial backup has been performed, I have scheduled the backup to run at night every.
All in all I think that this solution is much better than the old one. All of our media files are now stored on the DiskStation and the backup is done as described. On my Mac I run TimeMachine to backup my laptop automatically. I will be able to go to sleep each night being sure that the things that I have added are safely transferred to my Amazon S3 account.
Mar 26, 2010
Configuring and Installing my Synology DS110j NAS
It is now time to configure and install my brand new Synology DS110j NAS. It comes with a CD containing V2.2 of the firmware and the desktop application. However I want to use V2.3, since it has support for backing up to a remote Amazon S3 account. I had downloaded and installed V2.3 of the desktop application. The desktop applications are the Synology Assistant and DownloadRedirector. The Assistant is used to find all the Synology servers on your network. When it does, you could use it to configure it and do basic setup. It also contains a resource monitor and a photo uploader. The DownloadRedirector is used for setting up downloads that downloads files directly to the DiskStation. Thus it is time to start the Synology Assistant.
When starting the Assistant you see a list of servers. In my case there was only one. The status of it was "not configured". By double clicking on it, I started a configuration wizard. I used the standard settings on every page. However at the last page I was given the choice to select which firmware version. Good! I selected the downloaded zip file. It complained that it was not the correct file extension. It should a .pat file, that is a firmware patch file. OK, I double clicked on the zip file to extract it. No .pat file inside it. I downloaded another version to figure out if it contained a .pat file. But no success. I decided to go with the supplied version while I was to figure out what the problem was. Some people have complained about the long configuration time, especially the formatting have been causing problems for a lot of people. When I started the configuration I was told it could take about 10 minutes. It looked like this:

Meanwhile I was trying to figure out what the problem with my downloaded firmware was. Could not figure it out. Time to test the support. I filled in a rather basic issue report on-line. After that I continued to find the problem. Unzipped the original zip file once more. What? I saw the status information flashing by "Unzipping .pat file" or something. Does it really contain a .pat file? Strange! Is it a hidden file. No, it would not be possible to select the file by default then. Maybe it was the archive utility that is causing me all the trouble? I decided to use the command line zip. An there it was. The zip contained a .pat file. However the .pat file seems to be a zipped file as well. When it is discovered by the archive utility, it unzips this as well. In normal cases this is a good thing. If you extract a .tar.gz file, this is what you want.
For those of you that encounter the same problem, let me explain in more detail. You start the Terminal. You find it in the Utilities folder in the Application folder. The type the following (assuming that you downloaded it to the Downloads folder)
As a result you have a file called synology_88f6281_110j_1141.pat in your Downloads folder. Very easy if you know how to do it.
Now let me continue with the story. The next thing I decided to do was to setup the printer. The printer has always been connected to my wife's computer. The reason for this is that she simply print more documents than me and my laptop is not always at home. However I find it annoying to start her computer to print a single document. This day I for once really needed to print a document.
When the device was configured, I connected to it. This was done by double clicking it or select it and select connect. A web page was prompting me to login.

After login I found the "USB Printer" in the folder "External Devices". I plugged in the printer and it was automatically discovered. This is how it looked like:

I Googled the Internet and found the same description on the Synology wiki. However it contained more information for newer Mac OS versions. I started the configuration, but halted when I was prompted to enter an IP address. Not good! I should enter a name and the IP should be resolved automatically. After a little bit of research I found something called Bonjour. It is a service discovery protocol. Actually it is Apple's implementation of Zeroconf. I found the configuration for this in Home->File Sharing->Win/Mac OS. I enabled the Bonjour broadcast as seen here below.

From now on it was simple. Just opened the "System Preferences", clicked the "Print & Fax" button. Pressed the + button below the printer list. The printer was automatically discovered. Very easy setup.
This is all for now. Look out for my adventures with my DiskStation.
When starting the Assistant you see a list of servers. In my case there was only one. The status of it was "not configured". By double clicking on it, I started a configuration wizard. I used the standard settings on every page. However at the last page I was given the choice to select which firmware version. Good! I selected the downloaded zip file. It complained that it was not the correct file extension. It should a .pat file, that is a firmware patch file. OK, I double clicked on the zip file to extract it. No .pat file inside it. I downloaded another version to figure out if it contained a .pat file. But no success. I decided to go with the supplied version while I was to figure out what the problem was. Some people have complained about the long configuration time, especially the formatting have been causing problems for a lot of people. When I started the configuration I was told it could take about 10 minutes. It looked like this:

Meanwhile I was trying to figure out what the problem with my downloaded firmware was. Could not figure it out. Time to test the support. I filled in a rather basic issue report on-line. After that I continued to find the problem. Unzipped the original zip file once more. What? I saw the status information flashing by "Unzipping .pat file" or something. Does it really contain a .pat file? Strange! Is it a hidden file. No, it would not be possible to select the file by default then. Maybe it was the archive utility that is causing me all the trouble? I decided to use the command line zip. An there it was. The zip contained a .pat file. However the .pat file seems to be a zipped file as well. When it is discovered by the archive utility, it unzips this as well. In normal cases this is a good thing. If you extract a .tar.gz file, this is what you want.
For those of you that encounter the same problem, let me explain in more detail. You start the Terminal. You find it in the Utilities folder in the Application folder. The type the following (assuming that you downloaded it to the Downloads folder)
cd Downloads


unzip synology_88f6281_110j_1141.zip
As a result you have a file called synology_88f6281_110j_1141.pat in your Downloads folder. Very easy if you know how to do it.
Now let me continue with the story. The next thing I decided to do was to setup the printer. The printer has always been connected to my wife's computer. The reason for this is that she simply print more documents than me and my laptop is not always at home. However I find it annoying to start her computer to print a single document. This day I for once really needed to print a document.
When the device was configured, I connected to it. This was done by double clicking it or select it and select connect. A web page was prompting me to login.

After login I found the "USB Printer" in the folder "External Devices". I plugged in the printer and it was automatically discovered. This is how it looked like:

I Googled the Internet and found the same description on the Synology wiki. However it contained more information for newer Mac OS versions. I started the configuration, but halted when I was prompted to enter an IP address. Not good! I should enter a name and the IP should be resolved automatically. After a little bit of research I found something called Bonjour. It is a service discovery protocol. Actually it is Apple's implementation of Zeroconf. I found the configuration for this in Home->File Sharing->Win/Mac OS. I enabled the Bonjour broadcast as seen here below.

From now on it was simple. Just opened the "System Preferences", clicked the "Print & Fax" button. Pressed the + button below the printer list. The printer was automatically discovered. Very easy setup.
This is all for now. Look out for my adventures with my DiskStation.
Mar 22, 2010
Unboxing Synology DS110j NAS
Yesterday I came home from Istanbul, Turkey. My NAS that I ordered a couple of weeks arrived at the DHL pickup place the day I left for Turkey. As you might have guessed I have been eagerly awaiting to pick it up. Today I got some spare time to pick it up. I have always loved to unbox new technical stuff. This time I thought it was a good idea to do an unboxing article. Please enjoy!
The first look at the stuff I received:

To the right you see the Synology DS110j NAS. There is no harddrive included, so you must install one yourself. To the left you see the harddrive that I ordered. It is a Western Digital Green 640 MB. All Synology products are energy conscious. Thus I hope that I get a solution the is environmental friendly and does not give me big electrical bills.

Here you see the label on the side listing the main features of the DS110j. The specifications are there as well. For more information please download this document.
 The box contains two smaller boxes and the power cord. The box to the left contains the NAS device and the box to the right some additional cables and the power supply. Let us take a look a closer look at the box to the left.

Now we are getting somewhere. The NAS is about the be unveiled. But there seems that I need to read something first. Synology have saved some trees by printing a very small booklet. It references to the documentation stored on the enclosed CD. So you need a computer to set things up, but that should be no surprise since it is intended to be used with your computer.
This is how the front looks like
 A fairly regular set of LEDs and buttons. From top to bottom, the LEDs are; STATUS, LAN, DISK. Below the DISK LED there is an unnamed LED. Maybe a LED showing the USB status. Me do not know. Then comes a USB connector. Here you could connect a harddrive or a printer. If you connect a harddrive or a memory stick here it is possible use the USBCopy functionality. By pressing the button below it, the content is copied to the diskstation. At the very bottom you find the On/Off button and the corresponding LED. This turns into blue when the device is on. It blinks when the device is starting up.
The back looks like this


The first look at the stuff I received:

To the right you see the Synology DS110j NAS. There is no harddrive included, so you must install one yourself. To the left you see the harddrive that I ordered. It is a Western Digital Green 640 MB. All Synology products are energy conscious. Thus I hope that I get a solution the is environmental friendly and does not give me big electrical bills.

Here you see the label on the side listing the main features of the DS110j. The specifications are there as well. For more information please download this document.


Now we are getting somewhere. The NAS is about the be unveiled. But there seems that I need to read something first. Synology have saved some trees by printing a very small booklet. It references to the documentation stored on the enclosed CD. So you need a computer to set things up, but that should be no surprise since it is intended to be used with your computer.
This is how the front looks like

The back looks like this

At the top you see the fan. Below it is two USB connections. These could be used the same way as the front connection. Next up is the Ethernet connection. There is also a reset button and a power connector. To the right you have a keylock hole.
Now it is time to take a look inside. Just put it on the table and push the lid forward. Very easy. I still remember those old PC cases where it very long time to get open the case.

To install the harddrive you just push the it into the slide. When it is in place, you use the screws that are included to fasten the harddrive.


On with the lid again. Two more screws to fasten the lid and the NAS is ready to use. Connect the power supply and the network cable to the switch. It only took me a couple of minutes to install the harddrive and connect the NAS. I think that even a non-technical person could fix this very fast.
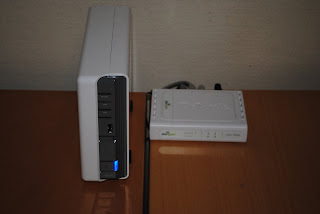
Now everything is in place. The NAS is situated near the office switch. The switch is a D-link Green DGS-1005D, which also is environmental friendly. It switches of the power when a connection is idle for a long time and adjust itself to the length of the connected cables. The supplied network cable was to long, so I replaced it with the shorter one (0,5m).

Now it is ready to be used, nearly anyway. It needs to be configured. But that is another story. The unboxing took me less than 20 minutes, although I did it very slowly and spent some time taking photos. As mentioned it is easy to install your own harddrive and easy to get started. So far so good anyway.
Mar 9, 2010
My NAS Research (D-link, Netgear and Synology)
Last week I decided to buy a NAS. Every time I buy some new geek stuff, I spend many hours on research to select the optimal model. I usually start out with a price comparison site like pricerunner or prisjakt (in Swedish only). Of course I set up some requirements as well. My initial requirements was:
When I receive the NAS I want to change the network a little bit as well. This is how it looks today:

Our family photos are saved on either of the external harddisks. I sync these harddisks with the excellent Beyond Compare tool. When in sync, I use Jungle Disk to do the backup. Even though Beyond Compare is my favorite tool, I find it a little bit boring to synchronize these harddisks. This is where the new solution should be a little bit smoother.
This is how it should look like after the upgrade.

Now we could store all of our photos on the Synology NAS server. The NAS server do backup at scheduled times. No need to synchronize the harddisk anymore. Each the computers should backup other valuable content as well, to the NAS. There is still room for improvement. For example, I plan to have wired connections to all computers in the household. The "old" switch that is used for the home entertainment should be replaced by a faster one.
But what model did I choose? You might have guessed it; I ordered the Synology DS110J together with a Western Digital Green 640 GB harddisk. This way I have an environmental friendly solution. All Synology products are designed to be environmental friendly. Notice that I use a D-Link Green DGS-1005D switch in the new network solution.
That is all for now. I am really eager to get started with my new NAS. The original ETA was tomorrow, but the time seems to have slipped. I hope that it will arrive before the weekend.
- Support for Windows & Mac OS (Samba or an equivalent solution)
- Secure FTP server
- Reasonable amount of harddisk space
- Netgear Stora Home Network Storage MS2110
- D-Link DNS-313 or D-Link DNS-323
- Synology Diskstation DS110J or DS210J NAS server
When I receive the NAS I want to change the network a little bit as well. This is how it looks today:

Our family photos are saved on either of the external harddisks. I sync these harddisks with the excellent Beyond Compare tool. When in sync, I use Jungle Disk to do the backup. Even though Beyond Compare is my favorite tool, I find it a little bit boring to synchronize these harddisks. This is where the new solution should be a little bit smoother.
This is how it should look like after the upgrade.

Now we could store all of our photos on the Synology NAS server. The NAS server do backup at scheduled times. No need to synchronize the harddisk anymore. Each the computers should backup other valuable content as well, to the NAS. There is still room for improvement. For example, I plan to have wired connections to all computers in the household. The "old" switch that is used for the home entertainment should be replaced by a faster one.
But what model did I choose? You might have guessed it; I ordered the Synology DS110J together with a Western Digital Green 640 GB harddisk. This way I have an environmental friendly solution. All Synology products are designed to be environmental friendly. Notice that I use a D-Link Green DGS-1005D switch in the new network solution.
That is all for now. I am really eager to get started with my new NAS. The original ETA was tomorrow, but the time seems to have slipped. I hope that it will arrive before the weekend.
Feb 14, 2010
Ego Surfing - Microlog4Eclipse
Sometime I do some ego-surfing. I check if there is anything written about Microlog or any other open source projects that I am involved in. One funny thing is that I found the podcast that I and Darius Katz was part of as a ringtone. Maybe it is a bestseller? :) But I just found a more serious project, namely the microlog4eclipse project. It is an Eclipse plugin to simplify the usage of Microlog. Or as it say on the project page "Plugin for j2me microlog logger based on android adt plugin". I wonder if they are using the Android part of the Microlog library. There is no download available at the moment. I will investigate this further. Curious to check it out. It is interesting that someone is actually writing a dedicates Eclipse plugin for Microlog.
Jan 17, 2010
The Beauty and the Beast - Apple MacBook and Dell XPS M1710
A couple of years ago I bought a Dell XPS M1710. At the time this was one of the fastest laptop computers around. It is primarily designed as a gaming/multimedia laptop. The design is made to appeal gamers (see picture). As a developer I need a high performance computer. So this was a perfect choice for me, at least this was what I thought. As it turned out it, it has not been as good as one could imagine. There have been many problems with it during the years. The biggest problem are the fans. When running Windows Vista they are quiet at first. The first time you use Maven, or similar, the fans are up to full speed within seconds. I have tried several fan control applications but these did not solve the problem. The problem only manifested itself in other ways. I also tried to use Linux. With Linux things are much better. Linux does not seem to strain the CPU so much as Windows Vista. Fortunately Dell support gave me two new fans. Another problem is the battery. At full capacity they last for about 2 hours during normal work. after about 18 months a needed to buy a new one. This is not really acceptable. Speaking of power; I had to replace the power supply as well. As with the fans this was replaced by Dell. Thank God I had paid extra to get full support. Or I should thank my colleague Darius who convinced me to pay some extra bucks to get the full support.
Before Christmas it was time to buy a new laptop. I was a little tired of the bad quality of my Dell computers, so I decided to try something new. I decided to buy me an Apple MacBook Pro instead. By selecting a 15” screen I was able to fit in a Solid State Drive (SSD) within budget. Although not so big, it is only 128 Gb. But since I use an external hard-disk for data, this is not so much a problem.
Now here I am sitting by my brand new MacBook and writing this article. I have about 7-8 hours battery capacity. According to the specification I have only 7 hours capacity, but I think the SSD gives me some extra time. The SSD is supposed to use less power than a normal drive. Of course this would degrade over time, but it is in par with my Asus netbook computer. So for I am very satisfied with my new computer. It was not so hard to get used to as I initially anticipated. Many people have told me about their frustration when switching to an Apple computer. I am familiar with Unix and Linux and many things could be achieved in a bash shell. In my daily work I use VirtualBox to run Ubuntu Linux. My fear was that the performance would be to bad and get annoyingly slow. But so far I am not frustrated by slow speed. In fact I was surprised. I have been using VirtualBox on my old XPS, but it was to slow to be really joyful. What more is there there to say? The MacBook works like a charm and is really fun to use. It is fun to compute! ;-)

The Beauty

The Beast

The Beauty and the beast
Oct 14, 2009
Microlog Development $$$
I have often wondered how many hours I have spent on Microlog. It is countless hours of fun and sometimes frustration. But it is definitely worth it. I guess my wife beg to differ :) Anyway; there is a site called ohloh. This site collects data from the Internet about open source projects. It analyzes the code for a lot of things. For example it checks how well documented the code is. Another interesting metrics is the calculated development cost. Here is a list of the projects that I am involved in:
- Microlog - $ 435,348
- Microproperties - $ 2,955
- Microinstall - $ 12,018
- Voxtr - $ 29,963
May 14, 2009
Available on Twitter
I am now available on Twitter. Use the link to the left if you want to follow me on Twitter. This is kind of a experiment for me. I am not sure whether I like Twitter or not. But at least it is worth a try.
Subscribe to:
Posts (Atom)